Recoloring assets at runtime in elf game
intro
first disclaimer: this is just how i decided to do things and i've been using godot for barely a month so there's likely things that could be done better, but it does work. that said if you have suggestions on how to improve feel free to let me know!
when i was trying to decide on ways to handle color choices in the character creator, two implementation options were covered in example/guides and the such:
- have every asset image available in every color
- have every asset image available once in white, and use modulate/multiply to add color programmatically
the issues with (1) should be pretty obvious: not only do you have to recolor everything manually, but you have to have as many files for each asset as you have colors, so it scales incredibly badly both time-wise (your time) and storage-wise (you need to have all the files included with the game).
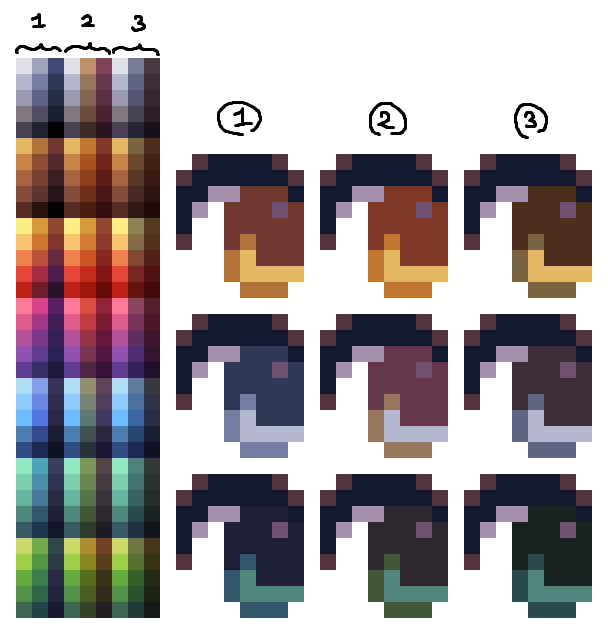
(2) already sounds more reasonable, since it scales well both time-wise and storage-wise, but the way modulate works means that you only use one color to modulate with, instead of having control over every swatch in the image. that's not inherently a bad thing, but i personally like having control over all the colors in an image (doubly so for pixel art). see below for the difference between column 1 (manual palettes) and 2-3 (modulate with different color bases).
so, in comes option 3, which i ended up coding from scratch and is what i decided to implement in this game: have every asset image available once in a pre-determined palette, and use shaders to palette-swap at runtime. it scales as well as (2) because i only need one image per asset, and while setting up the palettes takes a little longer, it's work that only has to be done once and then never needs touching again.
in theory it'd be possible to set up the list of palettes as just using Color objects or hex codes, but i find it a lot more intuitive to make/edit the palette file in an image editor, so i went and coded a script that can read the palette file i give it and translate to Color objects as needed.
so, in practice, on top of the standard asset files, i end up with two other files:
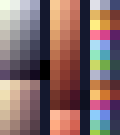
- a "reference" file that lists all the colors from the asset files i want to edit (from left to right: hair color, skin color, marking color, eye colors)

- a "palette" file that lists all the palettes i want to make available (truncated preview, from left to right: hair colors, skin colors, eye colors)
(note: you can also make one file for each type of palette you want, i just wanted to keep everything in one place because otherwise i get easily confused. it's very slightly simpler code if you have one file for hair colors, one for skin colors, etc)
and using those, i need to code two things: some manner of ui so people can select palettes, and the shaders to actually apply said selection.
palette selection node
the palette selection is reasonably simple to set up, we just need to:
- decide what columns in the palette file we're reading from, and which one specifically to display as the selectable swatch
- read through all the lines in the palette file, and for each of them, build an array of Color objects corresponding to the palette
- fill our grid node with a bunch of buttons that link a swatch to a whole palette
in practice, here's a runthrough of the code for the palette selection node (implemented as a GridContainer, using markings as an example):
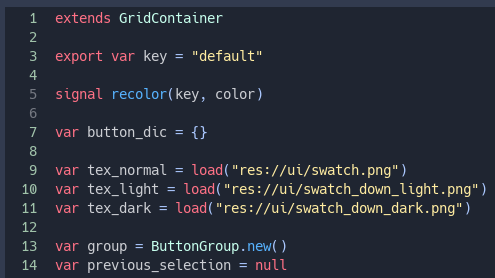
3: used to keep track of which part of the character i'm recoloring, edited via the node options
5: signal sent when we click on a swatch, containing the palette info linked to that swatch
7: list of all the swatch buttons in the palette grid
9-11: textures for the buttons (light/dark versions on press to prevent from blending in with the swatch/background)
13: ButtonGroup is necessary to handle toggle functionality on the swatch buttons (we only want one of them selected at any given time)
14: used to prevent sending the recolor signal again if we click on the same button twice in a row
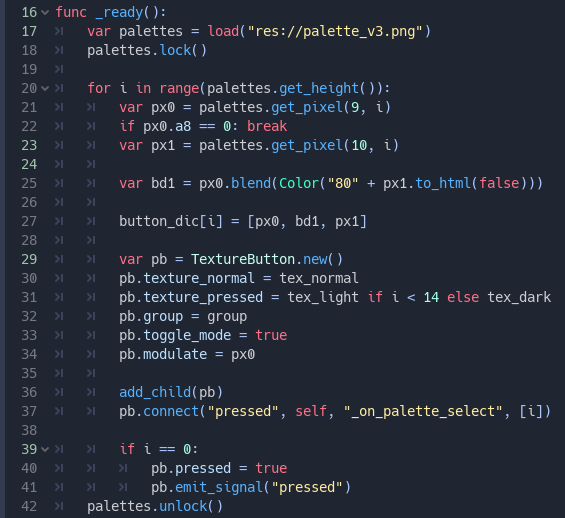
17-18: loads the palette file and locks it so we can read pixel data
21-27: reads the pixels from the palette file and stores them into an array. line 22 stops the loop if we reach a line of transparent pixels (no more colors to read!) and line 25 blends a 50/50 mix of two of the pixels programmatically because it's easier than blending it myself in aseprite
29-34: creates the actual swatch buttons, sets the appropriate light/dark texture, and sets its modulate to the first color in the palette
36-37: adds the button to the grid and links its "pressed" signal to a function later in the file
39-41: "clicks" on the first swatch so we don't get any weird behavior with not having any of the swatches toggled when the menu opens
42: locking the palette file again since we're done using it

as mentioned in line 37 above, this sends a signal with the key defined in line 3 and the palette linked to the swatch that was clicked, but ignores any clicking on the currently selected button
coding the shader
in theory the shader is reasonably simple, since essentially all we need is "here's a file with the target colors, here's another with the new colors" and let it do the replacing, but in practice it's not quite trivial to write, especially for someone like me who's new to shader coding.
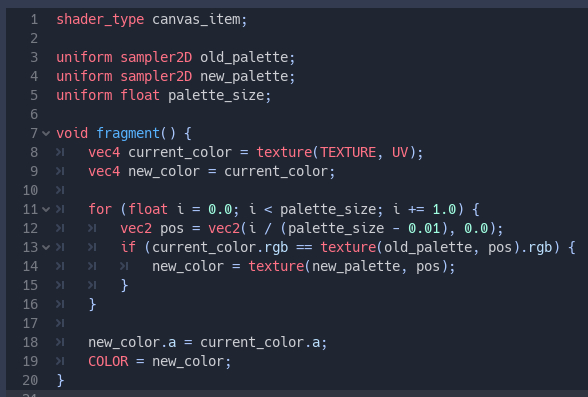
in the editor for the parameters, old_palette and new_palette are both the reference file listed earlier (imported as a texture), and palette_size is the width of the reference file. there isn't a ton to comment past that. for every color in the palette, we replace the old one in the image with the new one, keeping opacity intact.
tying everything together
with the shader and buttons coded, all that's left is something to tie the signal to the shader, and it's this little snippet of code here:
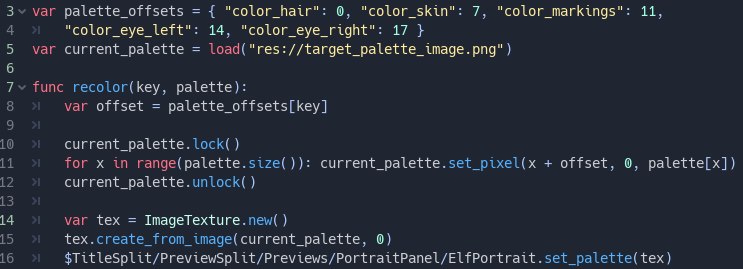
3-4: offsets (with names matching the key variable all the way back up in palette selection) so we know what part of the reference to replace with what colors
5: reference file from earlier, but with a different name because we're importing it as an image. this has to do with how godot reads image/texture data differently
10-12: replace all the pixels in the reference image that correspond to the channel we want to modify
14-16: create a new texture from this reference image (shaders can only take textures as input, not images) and apply it to our material
on line 16, the set_palette method is just a wrapper for get_material().set_shader_param("new_palette", palette)
make sure you make a ShaderMaterial object and assign it to the part you want recolored, and then assign your shader script to it, as well as linking the recolor signal from the palette selection to wherever you want the above code to run.
result, with a couple more bells and whistles:

and that covers most of how the recoloring works! actually changing the image for each option is as simple as having it load a different texture, since the material stays unchanged. the way recoloring works for markings is a tiny bit more complicated as it uses what amounts to improvised masking mixed with the recoloring. i won't be sharing the code for it here since it's a bit more finicky and needs refactoring at the moment. the cool thing with this shader is it means i can also use it with all the npcs in the game, reusing any relevant assets without needing a full-on unique colored copy of their portraits/sprites
i hope this makes sense and explains things to anyone interested! feel free to throw questions at me over any of the implementation :>
Comments
Log in with itch.io to leave a comment.
Oooh, this technique can also be used to apply dynamic lighting effects, underwater desaturation, glowing parts that stand out in fog, etc.
yeah, you could totally do stuff like that with it! i think for some of those effects it might be easier to use more general post-processing filters, but you could definitely play around with this as well :)
You could use a regular filter to apply a colour over everything, but this would allow lights from the left to only light up the exposed left faces of the sprite.
OMG thank you so much for writing this up!! this lil game thing was already a huge inspiration and now I know that youre also working in godot im like aaaaa!! Keep up the amazing work!!!!
aa, you're welcome, i'm glad if it's helpful! i'm really touched to hear this is an inspiration, thank you!! ;w;